Tools & Cleaning • $299
Shooters Global SG Timer 2
- ✓Bluetooth + free mobile app
- ✓PractiScore 2 integration
$329.90
View at OpticsPlanet

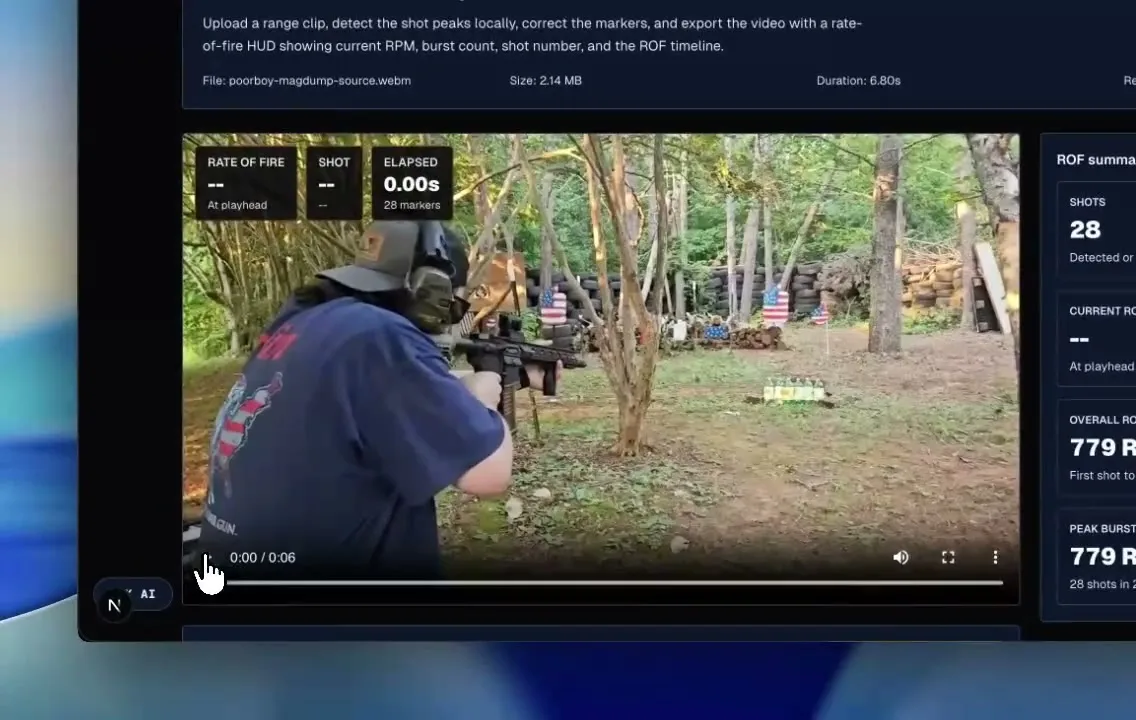
Step-by-step shot timer video workflow for your own range footage. Covers trimming, local browser analysis, shot-spacing tuning, marker correction, CSV/JSON export, and annotated video review with the free Rifle Configurator shot timer video annotator.
A shot timer video workflow turns your own range footage into usable split data. Pick the cleanest clip from your phone, action camera, or match video, run it through the free shot timer video annotator, then correct the markers before exporting CSV, JSON, or an annotated overlay.
Best clip: Use your footage where your shots are clearly louder than nearby bays, music, narration, or handling noise. First-person is useful, but not required.
Best workflow: Trim to the drill, load it locally, choose clean-range or action-cam detection, review weak candidates against recoil, use AI review only for messy match clips, classify long gaps, then export CSV and annotated video.
Reality check: Video timing is after-action analysis. For live par times, start beeps, and match workflow, pair it with a real timer from the best shot timer guide. If the clip is a rapid-fire string and the question is burst RPM, use the rate of fire video guide.
The recording below shows the workflow with sample rapid-fire footage, but the steps are the same for your own phone, GoPro, or match video. Load the clip, pick the detector, check the shot list, and export the result.
The current detector is intentionally conservative on match video. On the first 25 seconds of the sample clip, action-cam mode starts with 18 confirmed markers instead of treating every sharp transient as a shot. After you ignore the make-ready audio before the first live round, the review pass is 11 confirmed markers plus candidates to check against visible recoil.
| Pass | Sample result | How to use it |
|---|---|---|
| Clean range audio | 35 markers | This mode overcounts the sample match video. Keep it for clean phone clips where shot reports are the dominant peaks. |
| Action-cam, untrimmed | 18 markers + 20 candidates | Starts conservatively, but the source clip still includes make-ready handling before live fire. |
| Ignore setup audio | 11 markers + 20 candidates | Scrub to the first live shot, set ignore-before, then promote only candidate peaks that match visible recoil. |
| Reviewed export | 22 reviewed shots | The sample export below uses the first 25 seconds after setup noise is removed, clear movement noise is discarded, and the live-fire markers are checked against the video. |
This export uses the first 25 seconds of the same sample clip after setup noise is ignored and the markers are reviewed against visible recoil. The overlay keeps the shooting footage, shot markers, and split-time readout together so the result can be reviewed without reopening the tool.
New training guides, video workflow updates, and performance analytics tools sent as we publish them.
The best shot timer video is the clip that makes your shots easy to separate from everything else. Clean audio matters more than camera angle, and short clips are easier to fix than full range sessions.
| Factor | What to use | Why it matters |
|---|---|---|
| Audio ownership | Your shots are the loudest sounds | The detector marks sound impulses, not intent. If another bay is louder than your gun, trim the clip tighter or correct the extra markers manually. |
| Camera angle | Gun movement is visible | You need enough visual context to confirm each marker. First-person footage is ideal, but side video works when the shooter and gun are visible. |
| Clip length | 10 to 30 seconds | Short clips decode faster and make marker review less painful. Cut the reload setup, walking, scoring, and dead air before loading the file. |
| File format | MP4 or MOV | Phone and action-camera files usually work directly. If the browser cannot decode the audio, export a plain H.264/AAC MP4 and rerun it. |
| Shot cadence | Match spacing to the gun | Use lower spacing for very fast strings, higher spacing for echoes. The right value is the one that makes the marker count match the visible shots. |
Treat auto detection as the first pass, not the final answer. The tool is most valuable when the shot list, waveform, and video all agree.
| Step | Action | Output |
|---|---|---|
| 1. Pick | Choose the cleanest clip from your phone, action camera, or match video | A short range video where your shots are the dominant audio impulses. |
| 2. Trim | Cut to the drill or shooting string you want to measure | A compact MP4 or MOV with no long setup time before the first shot. |
| 3. Detect | Upload the clip and choose the detector for the footage | Clean-range mode for simple clips, action-cam mode for match video with weak candidate peaks. |
| 4. Correct | Tune spacing and promote only the candidates that match visible shots | Lower spacing for true rapid fire, raise it for echoes and handling noise, and ignore setup audio before the first live shot. |
| 5. AI review | Run Gemini review only when messy match footage still needs a second pass | The AI pass can auto-apply conservative add/remove marker changes, with a revert button if it is wrong. |
| 6. Export | Download CSV, JSON, and annotated video | Numbers for logging plus a shareable video overlay for coaching or review. |
The exported numbers are only useful after the markers are clean. Read the shot list like a training log: every row should correspond to a real shot, and every long gap should explain what happened in the drill.
| Metric | Meaning | Read it this way |
|---|---|---|
| Auto markers | Every detected shot | Marker count should match what you can see and hear in the clip. Delete obvious background shots and add any missed rounds. |
| Weak candidates | Review-only transients | Action-cam mode leaves borderline peaks off the shot list until you click one to promote it, which keeps match-video noise from inflating the count. |
| AI review | Optional auto-update | Gemini video review is a secondary pass for messy match footage. It auto-applies conservative add/remove marker changes and keeps a revert button if the pass is wrong. |
| Minimum spacing | Cadence control | Lower it when the tool merges real rapid-fire shots. Raise it when echoes, slide noise, or clipped audio create fake doubles. |
| First shot | From clip start | This is not a start-beep reaction time unless your trimmed clip starts exactly at the beep or signal. |
| Split time | Time between shots | Use split rows for drill review, cadence work, and finding where a reload, transition, or hesitation slowed the string. |
| Median split | Best cadence read | Median is usually more useful than average when the clip includes reloads, movement, or long pauses. |
| Fastest split | Verify on video | If the fastest split looks impossible for the drill, it is probably an echo or another shooter. Fix the marker before trusting the number. |
| Burst groups | Close strings | Burst grouping separates dense firing strings from pauses so the exported data is easier to read. |
| Exports produced | CSV, JSON, MP4/WebM | CSV is easiest for a training log, JSON preserves the full analysis payload, and the MP4 or WebM export creates the visible timing overlay. |
Start with the long gaps. A big split is usually a reload, transition, movement break, or stage reset. Select the later shot in the table and classify the gap so the CSV explains the pause.
Then check dense strings. Outdoor rapid-fire footage can show real fast splits, but clipped audio and nearby shooters can also create extra impulses. Use action-cam mode on match video, play the section slowly, watch the muzzle, and promote only candidate peaks that match visible shots.
Finish by exporting both data formats. CSV is for spreadsheets and training notes. JSON is the audit trail because it preserves the parameters, markers, burst data, and annotation labels.
Video analysis is excellent for review, coaching, and social clips. A physical timer is still better for live starts, par beeps, and match-standard practice. These are the hardware timers worth pairing with the video workflow.
Affiliate links (?)
Sling, light, backup sights, and QD mounts, the upgrades most builders add first.
Affiliate links (?)

Avid shooter with 10+ years of experience including competition shooting, and an associate member of the Professional Outdoor Media Association (POMA). Built 10+ AR-pattern rifles and several handgun platforms for home defense, competition, and suppressed night shooting.
This page contains affiliate links. Purchases through these links support the site at no extra cost to you. Read the affiliate disclosure
Continue exploring with these related resources
Learn how to turn rapid-fire range footage into a checked ROF overlay. Upload the clip locally, correct the shot markers, group the burst, review peak RPM, and export the video plus CSV/JSON data.

Dry fire is the highest-ROI, zero-ammo-cost way to build trigger control, draw speed, and sight tracking at home. This guide covers the non-negotiable safety protocol, the core drills that actually transfer to live fire, how to use scaled printable targets in a hallway, and the dry fire aids worth buying: SIRT pistols, laser trainers, dry-fire mags, and snap caps.
Best shot timer picks for 2026 ranked across competition, dry fire, and budget training. Shooters Global SG Timer 2, PACT Club Timer III, CED7000 Gen 2, AMG Lab Commander, Competition Electronics ProTimer BT, Walker's ShotSync, and Special Pie M1A2+ compared on PractiScore integration, Bluetooth, par time, and microphone sensitivity.
Related articles and industry updates
Glock officially confirmed a 15-round magazine for the G44 .22 LR training pistol, shipping to dealers in May 2026. The new magazine brings rimfire capacity to parity with the G19 for the first time since the G44 launched in 2020.
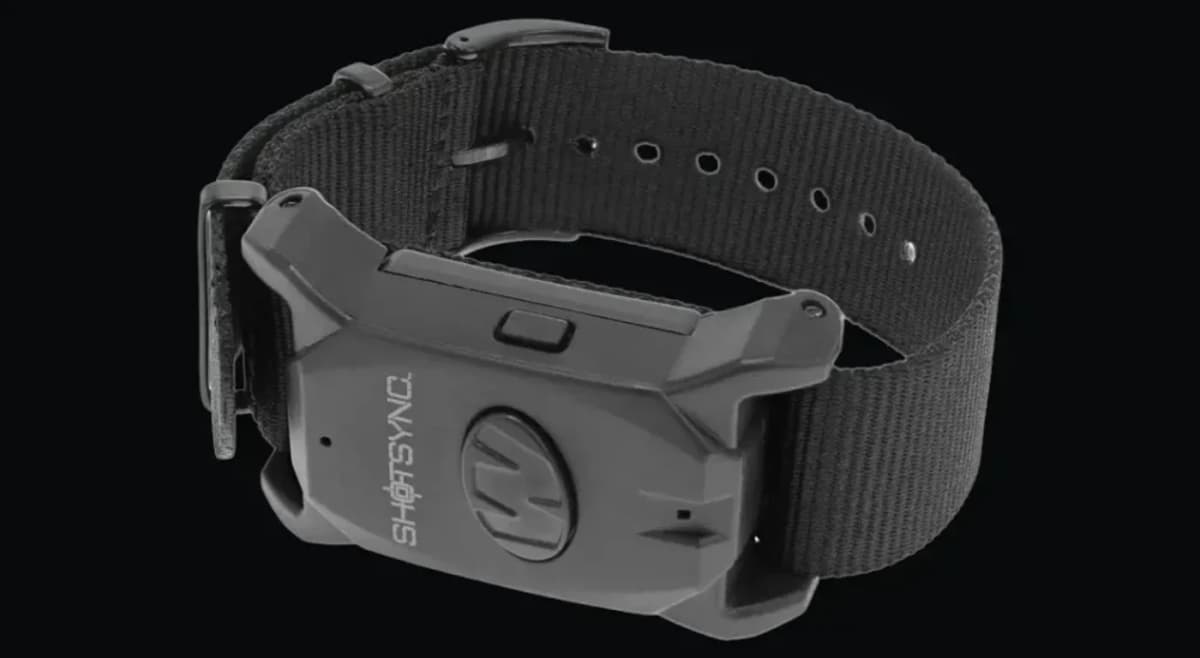
Walker's ShotSync is a $59.99 wrist-worn shot timer combining microphone and accelerometer sensors at 1.6 kHz. Bluetooth 5.2 pairs with the Walker's Link app to track draw times, split times, and session history from .22 LR through competition calibers.
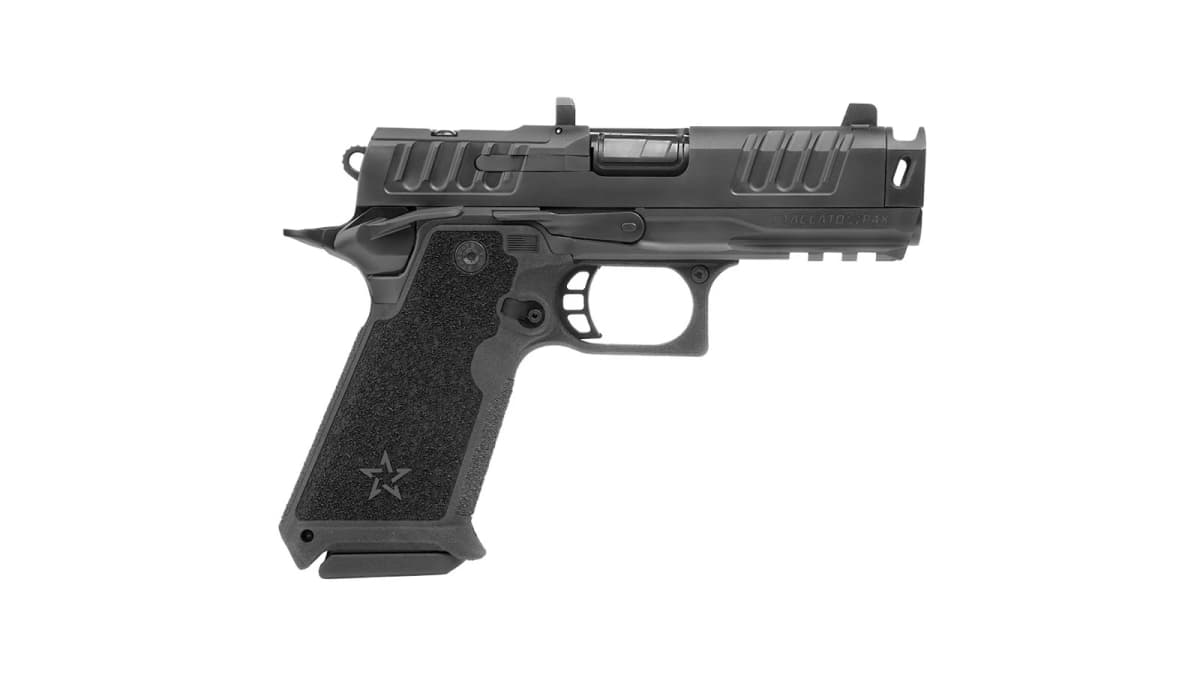
Staccato launches the HD P4X: a full-size, steel-frame 2011 with 18+1 capacity, a one-piece 4-inch compensated barrel, and Glock-pattern magazines. Starts at $3,599; ships to dealers July 13, 2026.