Holosun
Holosun IRIS-GR4
Quad-function device: white light, IR illuminator, green visible laser, and IR laser
Quick Specs
- Price
- $1,000
- Weight
- 8.5 oz
- Brand
- Holosun
- Category
- laser
Features
- •1000 lumen white light
- •60mW VCSEL IR illuminator
- •Green visible + IR laser
- •1x 18650 or 2x CR123A
Capability Boosts
Recommended For
+14 more
Where to Buy
Compare current prices and availability from retailers we work with.
Holosun IRIS 4 Quad Function Green Multi-Laser Device, Black, IRIS-GR4
Price History
90-day low $999.99Compatibility Tags
Overview
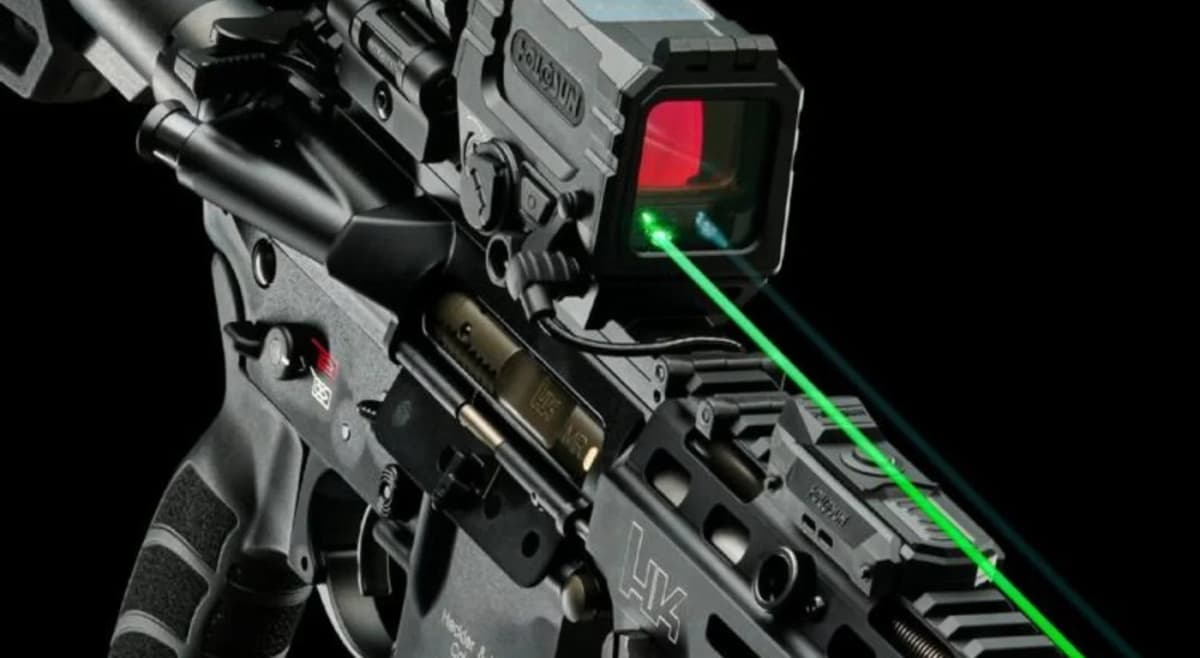
The Holosun IRIS-GR4 represents an evolution in multi-function weapon accessories, combining four essential capabilities in a single integrated package: a 1,000-lumen white LED weapon light (25,000 candela), 60mW VCSEL IR illuminator, co-aligned Class 3R green visible laser under 5mW, and Class 1 IR laser under 0.7mW. This quad-function design eliminates the need for separate weapon light and laser units, reducing weight, rail space, and complexity while maintaining professional-grade performance across all functions.
Built from 7075-T6 aluminum with hard anodize finish, the IRIS-GR4 achieves a 43% weight reduction, 29% lower profile, and 28% narrower footprint compared to Holosun's legacy LS420 series. The white light output of 1,000 lumens at 25,000 candela provides effective target identification out to 316 meters, while the 60mW VCSEL IR illuminator delivers the same clean, speckle-free infrared lighting found in the IRIS-GR3. The top-mounted beam divergence slider allows rapid adjustment from tight spot to wide flood for both white and IR illumination.
The co-aligned visible and IR lasers simplify zeroing procedures—dial in the visible laser during daylight and the IR laser is automatically aligned for night vision operations. Dual independent fire buttons provide ambidextrous activation, and the included three-button remote with Crane plug offers flexible switch placement. With 0.5 MOA per click adjustments and ±50 MOA total travel, the IRIS-GR4 enables precise zeroing across various platforms. IPX8 waterproof rating and 1000G vibration resistance ensure reliable operation in adverse conditions.
Key Features
- Quad function: 1,000 lumen white light, 60mW VCSEL IR illuminator, visible laser, IR laser
- 43% lighter and 29% lower profile than legacy LS420 series
- 25,000 candela white light output (316m effective range)
- 60mW VCSEL IR illuminator with adjustable flood-to-spot slider
- Co-aligned visible green (<5mW) and IR (<0.7mW) lasers
- Dual independent fire buttons for ambidextrous operation
- 0.5 MOA per click adjustments with ±50 MOA total range
- Dual power: Two CR123A or one 18650 rechargeable
- IPX8 waterproof and 1000G vibration rated
- Includes three-button remote with Crane plug
Pros
- +True all-in-one solution eliminates need for separate light and laser
- +Excellent white light output (1,000 lumens, 25,000 candela)
- +Proven 60mW VCSEL IR illuminator from IRIS-GR3
- +Significant size and weight reduction vs legacy models
- +Ambidextrous controls and included remote switch
- +Dual battery compatibility (CR123A or 18650)
- +Precise 0.5 MOA adjustments for accurate zeroing
Cons
- −Heavier than dedicated laser-only units (8.5 oz)
- −More expensive than separate budget light + laser
- −Additional complexity with four functions vs single-purpose units
- −Larger footprint than compact lasers
- −May not excel as much in single roles as dedicated units
Setup & Operation
Step-by-step procedures for setting up, operating, and maintaining the Holosun IRIS-GR4.
Install Batteries and Power Up
The IRIS-GR4 accepts either two CR123A primaries (included) or a single 18650 rechargeable in the same battery tube. The first power-up step is the same either way: unscrew the battery cap counter-clockwise, inspect the O-ring and battery compartment for grit or moisture, then load the cells in the orientation printed on the housing.
A low-battery indicator lights the rear LED solid red when cell voltage drops below 2.3 V DC. When you see red, swap the CR123As or charge the 18650 before your next session, the laser modules will lose stability before the white LED fades.
- • Two CR123A batteries (or one 18650)
- • Clean cloth for O-ring inspection
- 01
Confirm the rifle is unloaded
Drop the magazine, lock the bolt to the rear, and visually inspect the chamber before any work on the optic rail. Holosun's manual makes this the first instruction for a reason.
- 02
Unscrew the battery cap
Turn the rear battery cap counter-clockwise until it lifts free. The cap is captured to a lanyard on some production runs, do not yank if it resists.
- 03
Inspect the O-ring and tube
Wipe the O-ring with a clean cloth and check for nicks. A torn O-ring kills the IPX8 rating. Brush any sand or carbon out of the threads before reinstalling.
- 04
Load the batteries by the housing marking
Match cell polarity to the diagram molded into the battery tube. Two CR123As load positive-forward; an 18650 follows the same orientation. Mismatched polarity will not damage the unit but the device will not power on.
- 05
Reseat the cap and confirm power
Thread the cap clockwise until it bottoms hand-tight. Rotate the mode wheel off OFF (any V or IR position), press the fire button, and verify the corresponding emitter lights. If the rear LED flashes red, the cells are weak.
Never store the IRIS-GR4 with batteries installed. CR123A cells can vent under long-term storage and corrode the contacts. Pull cells if the rifle is going into the safe for more than a week.
Mount the IRIS-GR4 to a Picatinny Rail
The integral QD mount uses a Torx T10 thumbscrew (driver included in the box) and is rated for a 30 inch-pound clamp torque. Holosun documents a sub-2-MOA point-of-impact shift on remount, so once you have a zero you can pull the laser for transport and reinstall without re-zeroing.
Position the unit far enough forward that your support-hand thumb can reach the activation buttons without breaking your grip, but leave clearance behind the laser for the battery cap and remote ports.
- • Torx T10 driver (included)
- • 30 in-lb torque limiter or inch-pound wrench
- 01
Loosen the thumbscrew
Turn the T10 thumbscrew counter-clockwise until the clamp jaw opens wide enough to clear the Picatinny rail. Do not back the screw all the way out, you only need clearance.
- 02
Seat the mount on the rail
Drop the mount over your chosen rail slot, press the IRIS forward against the rear face of the slot. Forward pressure is what indexes the cross-bolt against the rail, not the screw.
- 03
Torque to 30 in-lb
Hold the unit forward and tighten the thumbscrew clockwise to 30 in-lb (3.4 Nm) with a torque limiter. Without a torque tool, grip the very end of the T10 driver with two fingers only and stop the moment you feel firm resistance, do not lean into it with a full hand.
- 04
Verify the clamp engagement
Tug the laser fore and aft, you should see zero movement. Any rock means the rail slot is loose or the cross-bolt is not seated; loosen, reseat, retorque.
If the T10 driver suddenly stops turning, you have hit the mechanical limit of the clamp screw. Forcing past this point will strip the threads and ruin the QD mount. Stop, back off, and reseat.
Read the 9-Mode Selector Wheel
The rear wheel rotates through nine positions. One position is OFF (marked with a circle), two positions drive the visible laser (AL and AH), and six positions drive the IR side in pointer, illuminator, and dual configurations at low or high power. Memorize the wheel before you go out, fumbling for a mode in the dark with a hot weapon is how negligent discharges happen.
Two buttons live on top of the housing. The fire button drives whatever the wheel is set to (visible OR infrared OR illuminator). The LED activation button always drives the visible laser plus the white light, regardless of where the wheel is, so you can flick to a target with light-and-laser without re-indexing the wheel.
- • Reference card or memorized mode chart
- 01
OFF
Wheel position marked with a circle. Disables both buttons except for the auto-off programming function described in the next section. Use this when transporting.
- 02
Visible Low (V-AL) and Visible High (V-AH)
Powers the green or red visible laser only. Low for indoor zero work and daylight movement, high for outdoor zeroing or harsh sunlight.
- 03
IR Pointer Low (AL) and High (AH)
Powers the IR aiming dot only, useful when you want a clean dot under NODs without any flood signature. Low extends battery, high cuts through atmospheric haze.
- 04
IR Illuminator Low (IL) and High (IH)
Powers the 60 mW VCSEL flood only, useful for searching or identifying without showing an aiming dot. The flood is what you use to find a target, the pointer is what you use to engage it.
- 05
Dual IR Low (DL) and High (DH)
Pointer plus illuminator together. This is the default engagement mode under NODs, you see both the aiming dot and the lit-up scene at once. Run DH when you need the most signal, DL when you want battery conservation.
A green LED on the rear of the housing illuminates anytime an IR mode is active (AL, IL, DL, AH, IH, DH). Use it to confirm IR output without putting on NODs.
Activate, Hold, and Auto-Off the Lasers
The IRIS-GR4 supports three activation styles for each mode: momentary, constant-on, and a programmable auto-off timer. Understanding which is active matters, a laser that auto-shuts mid-engagement is worse than one that never turned on.
Activation buttons live on top of the housing and on the three-button Crane remote. The behavior is identical between them.
- 01
Momentary on
Press and hold the fire button. The selected emitter stays on as long as you hold, up to a hard 60-second cap, then it auto-cuts even if you keep holding. This protects the diodes from heat.
- 02
Constant on
Double-tap the fire button (two short presses). The emitter stays on for five minutes, then auto-cuts. A single short press during the five-minute window cancels and shuts it off immediately.
- 03
Program the 5-minute auto-off
With the mode wheel on OFF, press and hold either activation button for five seconds. One blink of the visible laser confirms auto-off is ENABLED. Three blinks confirm it is DISABLED. Disable only if you have a specific reason, such as a known long observation window.
For most night work, leave auto-off enabled. Five minutes is plenty for a typical engagement, and the auto-cut saves both batteries and your night vision if you forget to release the switch.
Zero the Co-Aligned Lasers
Because the visible and IR lasers are co-aligned at the factory, you only need to zero the visible side. Once the green dot is on target at your chosen distance, the IR pointer is on the same line. This is the single biggest workflow advantage the IRIS-GR4 has over a separate-emitter setup like the older LS321.
Use the flat end of the included Holosun tool. The elevation turret sits on TOP of the housing, the windage turret sits on the LEFT side. Each click moves the dot by 0.5 MOA, total travel is ±50 MOA from optical center.
- • Included Holosun adjustment tool (flat end)
- • Stable rest or sandbag
- • Target at 25 yards (or your preferred zero distance)
- • NOD or thermal viewer to verify IR alignment (optional but recommended)
- 01
Stage at 25 yards
Set a paper target at 25 yards. This is the most common civilian NOD zero, it gives a usable point-of-aim from 0 to roughly 200 yards on a 5.56 rifle and matches most carbine red-dot zeros so you can co-witness.
- 02
Select V-AH (visible high)
Rotate the mode wheel to V-AH. The high-power visible mode is brightest and easiest to see on paper, especially with a green model in daylight.
- 03
Fire a 3-round group
From a stable rest, fire three rounds with the laser dot held on your point of aim. Measure the group center against the dot's position, not against a separate iron-sight POA.
- 04
Adjust elevation (top turret)
Seat the flat end of the tool into the elevation turret notch. Clockwise moves point of impact down, counter-clockwise moves it up. Count clicks, 2 clicks per inch at 25 yards (0.5 MOA × 4).
- 05
Adjust windage (left turret)
Move to the windage turret on the left side. Clockwise moves point of impact right, counter-clockwise moves it left. Refer to the directional diagram embossed on the housing if you lose track.
- 06
Confirm with a 3-round group, then verify IR under NODs
Fire a confirming group with the visible laser. Once the visible dot lands on POA, switch the wheel to AL or IL and verify under night vision that the IR pointer falls on the same hold. Co-alignment is checked at the factory but a hard impact can shift it; if IR and visible diverge, contact Holosun.
If the adjustment tool suddenly stops turning, you have hit the ±50 MOA mechanical limit. Forcing past it will damage the internal adjustment mechanism. Back off, re-check mount alignment, and consider whether the rifle's rail or barrel is the actual problem.
Tune the IR Beam from Flood to Spot
The IR illuminator has a top-mounted slider that varies the beam divergence between roughly 15 mrad (tight spot for distance ID) and 120 mrad (wide flood for room-clearing). The slider works only when the wheel is in an illuminator mode (IL, DL, IH, DH); it has no effect on the pointer or visible laser.
Push the slider forward (toward the muzzle) to widen the beam, pull it back toward you to tighten it. For most home-defense and close-range NOD work, run it nearly all the way forward. For 75-yard-plus target ID, pull it back to a tight spot and bump power to high.
The slider is intentionally stiff so it does not wander under recoil. If it feels gritty, that is normal break-in. Do not lubricate the slider, the lubricant attracts dust and degrades the seal.
Care, Storage, and Long-Term Maintenance
The housing is nitrogen-purged. Do not attempt to open it; you will release the inert fill, fog the internal optics, and void the warranty. External care is straightforward and the IPX8 rating handles weather, blood, and rinse-downs.
Lenses use the same care as any quality optic. Brush off particulates with a soft brush, then clean with a Holosun lens pen, microfiber cloth, or soft cotton. Skip dry tissue, paper towels, and shop rags, they leave silicate scratches that you cannot polish out. Skip organic solvents (alcohol, acetone, mineral spirits) too; they can attack the anti-fog coating on the internal surfaces over time.
After any hard impact (drop, weapon malfunction, sympathetic strike from a suppressor failure), check your IR-to-visible co-alignment under NODs at the same distance you originally zeroed. A small shift is the first sign the unit took a hit it should not have.
Detailed Specifications
- visibleLaser
- Class 3R green, <5mW
- irLaser
- Class 1, <0.7mW
- whiteLight
- 1,000 lumens, 25,000 candela (316m range)
- irIlluminator
- 60mW VCSEL (Class 1)
- Adjustment Type
- 0.5 MOA per click, ±50 MOA travel
- Battery Type
- Two CR123A or one 18650 rechargeable
- Mount Type
- Picatinny rail
- Waterproof Rating
- IPX8
- Material
- 7075-T6 aluminum, hard anodized
- dimensions
- 4.2 x 2.3 x 1.4 inches
- weight
- 8.5 oz
- temperatureRange
- -30°C to 51°C operating
- vibrationResistance
- 1000G
Compatible Platforms
+227 morePairs Well With
Top matchesCustom
Custom AR-15 (Build From Scratch)
1 shared compatibility tags
Custom
Custom AR-9 (Build From Scratch)
1 shared compatibility tags
Henry Repeating Arms
Henry Big Boy X Model (.357 Magnum)
1 shared compatibility tags
Kalashnikov USA
Kalashnikov USA KR-103
1 shared compatibility tags
Aero Precision
Aero Precision M4E1 Complete Rifle 16"
1 shared compatibility tags
Bravo Company Manufacturing
BCM RECCE-16 MCMR
1 shared compatibility tags
Similar Products
Related Guides & Articles
Guides
Best Holosun Optics 2026: Top Rifle & Pistol Red Dots Ranked (AEMS, 509T, ARO)
Best Ruger Max-9 Accessories 2026: Optics, Sights, Magazines & Holsters Ranked (Holosun, Swampfox, Night Fision, Galloway)
Best AR-15 Red Dots 2026: Aimpoint vs Holosun vs EOTech Compared


Build Your Custom Configuration
Add the Holosun IRIS-GR4 to your build and see how it enhances your platform.