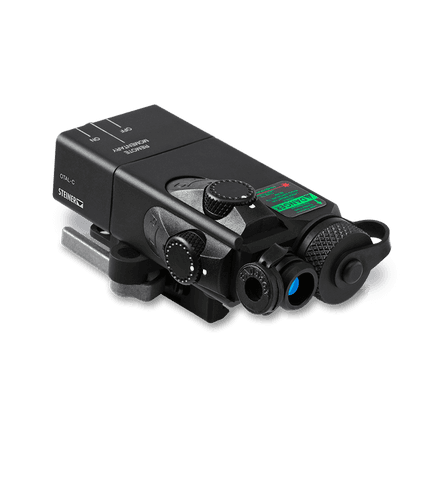
Steiner OTAL-C IR Laser
Compact IR-only aiming laser with low profile housing
- Price
- $599
- Weight
- 5.6 oz
- Brand
- Steiner
- Category
- Lasers
Featured in

Features
- •IR laser
- •Low-profile mount
- •Co-aligned optical bench
Capability Boosts
More rifle guides & articles
Guides




Overview
The Steiner OTAL-C IR (Offset Tactical Aiming Laser - Civilian) item 9056 provides a low-profile, lightweight 850nm infrared aiming laser designed specifically for carbine rails. This offset-mounted device positions the laser away from the centerline, allowing unobstructed use alongside top-mounted optics without interfering with the sight picture or adding unnecessary bulk.
Powered by a single AA battery, the OTAL-C delivers approximately 5 hours of runtime—significantly longer than CR123-powered alternatives. The momentary-on and constant-on operation modes provide tactical flexibility, while the quick-release HT mount enables rapid installation and removal from any NATO 1913 or Picatinny rail. Low-profile windage and elevation dials allow precise zeroing while reducing snag points and preventing accidental adjustments during field use.
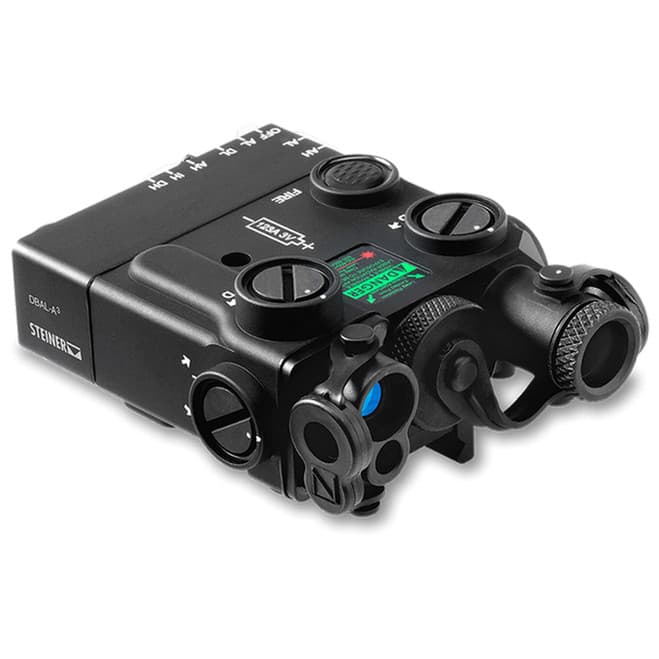
Built from lightweight but strong aluminum alloy with a black finish, the OTAL-C represents an economical entry point into IR laser aiming for users with night vision capabilities. While lacking the illuminator and visible laser features of full multifunction units like the DBAL-A3, the OTAL-C focuses exclusively on reliable IR aiming in a compact, affordable package. This specialization makes it ideal for users who have separate IR illumination (such as a weapon light) and simply need a dependable aiming laser.
Key Features
- 850nm Class 1 IR laser pointer under 0.7mW
- Offset 45-degree mount clears top-rail optics
- Single AA battery provides ~5 hours runtime
- Momentary-on and constant-on operation
- Quick-release HT mount for Picatinny/NATO 1913 rails
- Low-profile windage/elevation adjustments prevent snags
Pros
- +Affordable entry into IR laser aiming
- +Offset design eliminates interference with optics
- +Common AA battery reduces logistics burden
- +Extended 5-hour runtime vs CR123 alternatives
- +Low-profile design minimizes snag hazards
- +Simple, reliable operation without complex modes
Cons
- −IR only—no visible laser or illuminator
- −Limited 250-meter range vs premium alternatives
- −Class 1 output is lower than restricted higher-output IR-only devices
- −Offset mount may not suit all preferences
- −Basic feature set lacks advanced capabilities
Setup & Operation
Step-by-step procedures for setting up, operating, and maintaining the Steiner OTAL-C IR Laser.
Install the AA Battery
The OTAL-C runs on one 1.5 volt AA, which is the practical argument for it over a CR123 laser: the cell is available anywhere, including a gas station. Steiner recommends a high-quality battery and tells you to mount the unit far enough back on the rail that a cell swap does not require pulling it off the weapon.
Battery work is also where the manual's most repeated warning lives. The laser fires whenever the remote cable pressure pad is pressed, so a rifle set down on top of its pad is a rifle with a laser running.
- • One 1.5 V AA battery
- • Silicone grease for the O-ring
- • Soft cloth or cotton applicator
- 01
Clear the weapon
Be sure the weapon is CLEAR and on SAFE before proceeding. Steiner opens every procedure in the manual with this line.
- 02
Unscrew the battery cap counter-clockwise
Turn the battery cap in a CCW direction, then remove and properly discard the spent AA.
- 03
Inspect and clean the compartment
Check the battery compartment for dirt, moisture, and corrosion. Clean it with a soft cloth or a disposable applicator if needed, and let it air dry completely before the cap goes back on.
- 04
Inspect and grease the O-ring
Check the O-ring seal on the battery cap for sand and dirt particles and for cuts, nicks, or drying. Lubricate it with a thin film of silicone grease applied with your fingertips. Never use a sharp or metal object to lift an O-ring; it damages the ring or the groove contact surface.
- 05
Install the cell and hand tighten the cap
Install the AA as indicated by the marking on the laser housing, then reinstall the battery cap and hand tighten it in a CW direction.
Do not store the laser with the battery installed, and pull the battery any time the remote cable switch could be depressed accidentally. Steiner also warns against laying a rifle down in a way that rests its weight on the pressure pad switch.
Mount the OTAL-C on the Rail
The integrated quick-release mount attaches to any MIL-STD-1913 rail, and the OTAL-C assumes that rail runs parallel to the bore. Rail position is a zeroing decision and not only an ergonomic one: if the laser comes off, it has to go back in the same place or the zero goes with it.
Steiner is direct about the failure mode. Failing to fully tighten the quick-release mount causes zero retention problems, and the base of the mount has to sit fully seated on the rail with no front or rear overhang.
- 01
Clear the weapon
Confirm the weapon is CLEAR and on SAFE before mounting anything to the rail.
- 02
Choose a slot that leaves battery access
Place the unit far enough back on the rail to allow battery replacement without removing it from the weapon. The offset housing is meant to sit behind the front sight on M4-pattern rifles and project the beam around the sight tower.
- 03
Seat the base with no overhang
Confirm the base of the quick-release mount is fully seated on the MIL-STD-1913 rail with no front or rear overhang before you clamp it down.
- 04
Fully tighten the quick-release mount
Close and fully tighten the mount. A partially tightened QD mount is the single most common cause of a zero that will not hold on this device.
- 05
Sanity check the factory neutral projection
With the adjusters at factory neutral, the pointer should project on the same side of the target as the laser is mounted and must fall within 10.2 cm of the bore at 25 meters. Outside that, suspect the rail or the mount rather than the laser.
Note which rail slot you zeroed in. Steiner publishes no return-to-zero figure for an arbitrary slot on this mount; the manual's instruction is simply to return the laser to the same position.
Return the Adjusters to the Factory Neutral Preset
The OTAL-C ships preset to a neutral position where the laser beam runs parallel to the bore. Returning to neutral is the first move any time a zero has gotten away from you, and it is a defined sequence rather than a guess at center.
Always start with the adjuster marked U/D. Each adjuster carries a white dot and each adjuster guard carries a matching white dot; alignment of the two is the neutral index.
- • No tools required; the adjuster knobs turn by hand
- 01
Turn the U/D adjuster clockwise to its natural stop
Rotate the adjuster marked U/D clockwise until it reaches the natural stop. Do not force it past the mechanical stop.
- 02
Back it off one and one-quarter turns
Turn the same adjuster counter-clockwise one and one-quarter turns.
- 03
Index on the white dots
Turn it clockwise until the white dot on the adjuster aligns with the white dot on the adjuster guard. That is factory neutral for elevation.
- 04
Repeat the sequence on the R/L adjuster
Run the identical sequence on the adjuster marked R/L: clockwise to the natural stop, counter-clockwise one and one-quarter turns, then clockwise until the dots align.
The adjuster gets noticeably harder to turn as it approaches maximum clockwise travel. That rising resistance is the end of travel, not a stiff detent. Do not force an adjuster beyond its end of travel.
Load the Adjusters Before a Counter-Clockwise Move
This is the OTAL-C procedure most owners never read, and it is the one that decides whether a zero survives the drive home. Each adjuster has an internal spring, and a positive load is the controlled compression of that spring. Steiner requires it any time the aim point is moved counter-clockwise. A clockwise adjustment needs no positive load.
Each click moves the laser point approximately 1 cm at 25 meters, and a quarter turn of the adjuster is 8 clicks.
- 01
Work out the click count first
Measure how far the strike point has to move and convert it at 1 cm per click at 25 meters. Decide the direction before you touch the adjuster.
- 02
Overshoot 8 clicks counter-clockwise
For any counter-clockwise move, turn the adjuster an additional quarter turn, which is 8 clicks, past the position you want.
- 03
Come back clockwise onto the number
Turn the adjuster clockwise to land on the intended position. Steiner's own example: to net one click counter-clockwise, turn 8 clicks CCW and then 7 clicks CW.
- 04
Confirm the detent every click
Make sure the mechanism has engaged a detent and has not stopped between two of them. A partially engaged detent costs accuracy. Move one click at a time so the adjuster does not jump detents, and expect more resistance in extreme cold.
At the extreme ends of travel the laser point may trace a small loop on the target when you reverse direction, and it may not move a full 1 cm per click. Both are normal per the manual. If the click value has gone soft, return the adjusters to factory neutral and confirm the mount is tight and the laser is parallel with the barrel.
Zero the IR Laser on a 25-Meter Range
In the IR pointer configuration the beam is invisible without a night vision device, so plan on a NVD being part of the zeroing kit rather than an optional extra. The manual's procedure is built around a 25 meter zeroing target where each adjuster click moves the strike point 1 cm.
Direction is engraved on the housing. The top adjuster guard is marked U and D, the side adjuster guard is marked R and L, and arrows show which way the shot group moves. Clockwise on the top adjuster moves the group up, and clockwise on the side adjuster moves it right. Every direction in the manual is given from the shooter's point of view with the laser weapon-mounted.
The aim point is horizontally aligned with the bore and sits 2.6 inches above it, so a 25 meter zero carries a known vertical offset that matters at contact distance.
- • 25 meter zeroing target
- • Night vision device
- • Stable rest
- • Remote cable pressure pad switch
- 01
Set up the target and strike zone
On a 25 meter zeroing target, mark the designated strike point and the designated 4 cm or 6 cm strike zone for the weapon you are using, then mount the target at 25 meters.
- 02
Start from factory neutral
Set both adjusters to the factory neutral preset before firing. Zeroing from an unknown adjuster position wastes ammunition and can run you out of travel.
- 03
Activate the laser and aim center
Press the remote momentary switch to activate the aim point and aim at the center of the target through a night vision device.
- 04
Fire a three-round group
Fire a 3-round group and note where the center of the group falls relative to the designated strike zone.
- 05
Adjust, starting with U/D
Move the aiming beam adjusters to walk the center of the shot group into the designated strike zone. Always start with the adjuster marked U/D, and apply a positive load on any counter-clockwise move.
- 06
Repeat until the group holds
Repeat firing and adjusting until the group falls inside the strike zone. On an M16 or M4 series weapon, 5 of 6 consecutive rounds inside the designated 6 cm strike zone is the standard the manual sets for a finished zero.
Steiner rates the OTAL-Classic infrared pointer as a Class I eye-safe laser at 850 nm, under 1 mW, with a 56.8 meter unaided nominal ocular hazard distance; the visible red model covered by the same manual is Class IIIa at under 5 mW with a 79.2 meter NOHD. Do not stare into the laser beam, do not look into it through binoculars or telescopes, do not point it at mirror-like surfaces, and do not shine it into anyone's eyes. If a laser borelight was used to boresight, remove it from the weapon before firing.
Use the Remote Cable Switch
The remote cable pressure pad plugs into the back side of the laser housing and is the activation control the manual documents for the OTAL-Classic. It is momentary: pressing the pad activates the laser and releasing it turns the laser off. The pad gives a tactile, silent click when it activates, which is how you know you are on it without looking.
Mounting is hook and loop rather than a clamp. A half-inch hook strip is attached to the pressure pad at the factory and a five-eighths inch loop strip ships loose so you can put the pad wherever your support hand actually lands.
- • Supplied 5/8 inch loop tape fastener
- • Remote cable pressure pad switch
- 01
Plug the switch into the housing
Insert the remote cable switch plug into the receptacle on the back side of the laser housing and seat it fully.
- 02
Place the loop strip where your hand rests
Apply the supplied 5/8 inch loop tape fastener to the weapon in a position convenient for your support hand, then press the pad's factory-attached 1/2 inch hook strip onto it.
- 03
Test the momentary action
Press the pad and confirm the laser activates, then release and confirm it goes out. You should feel a tactile click at activation. The manual lists this switch test as a before-use and after-use check.
- 04
Disconnect by the plug, never the cable
When removing the remote cable switch, pull on the plug. Steiner calls out pulling on the cable as a specific caution, and a stretched cable is a service item rather than an operator repair.
Remove the battery before storing the rifle or any time the pressure pad could be compressed. There is no lockout on this device; the pad is the only thing standing between a stored rifle and a laser running until the cell is flat.
Clean and Inspect the OTAL-C
Operator maintenance is limited to inspection, cleaning, and swapping the battery before and after a session. The housing is aircraft-grade aluminum and the outer components are chemically resistant, so cleaning is genuinely simple: flush the exterior with water and wipe it down with a clean soft cloth, and do it any time the laser gets dirty or has been exposed to salt water. Confirm the battery cap is fully tightened before you flush it.
The exit port lens takes a soft cloth or disposable applicator dampened with water and nothing harsher. Before each use, check the battery compartment for dirt, dust, and corrosion, and check the battery cap O-ring for cuts and cracks.
Do not use gun cleaning agents containing perchloroethylene or methylene chloride; the manual states they may permanently damage the system. Steiner's preventive maintenance table also treats a gap between the front and rear sections of the housing, a missing switch knob or adjuster, and a cracked or missing exit port lens as faults that take the laser out of service.
Detailed Specifications
- sku
- 9056
- Laser Class
- Class 1 IR pointer
- Wavelength
- 850nm ±3%
- irLaser
- <0.7mW, <0.8 mRad divergence
- Battery Type
- One AA
- Runtime
- >3 hours
- dimensions
- 3.75 x 1.68 x 1.60 inches
- weight
- 5.6 oz with battery
- Waterproof Rating
- Submersible to 5m
- Mount Type
- Quick-release HT mount (Picatinny/NATO 1913)
- Material
- Aircraft aluminum, black finish
- Adjustment Type
- Low-profile windage and elevation
- warranty
- 1 year
Similar Products
Compatible Platforms
+228 more




Compatibility Tags
Build Your Custom Configuration
Add the Steiner OTAL-C IR Laser to your build and see how it enhances your platform.