SMS Laser
Trinity
Budget VCSEL IR laser/illuminator with exceptional value
Quick Specs
- Price
- $350
- Weight
- 6.7 oz
- Brand
- SMS Laser
- Category
- laser
Features
- •100mW VCSEL IR illuminator
- •IR laser
- •Green visible laser
- •Coaxially aligned
Capability Boosts
Recommended For
Compatibility Tags
Overview
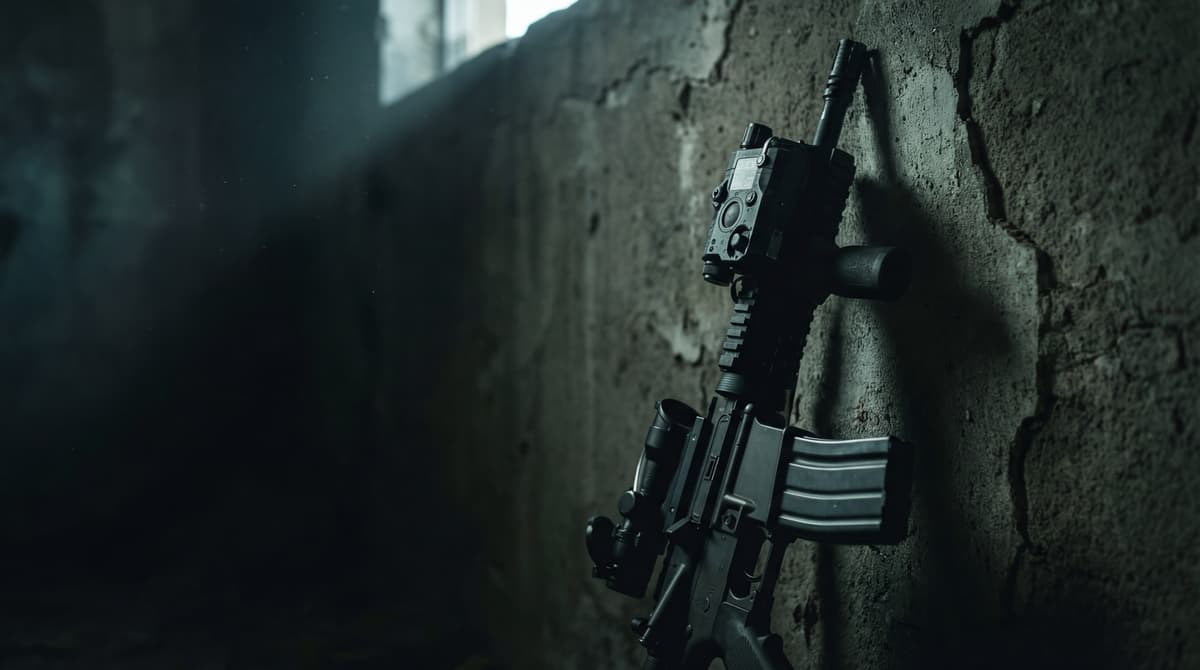
The SMS Trinity offers a 100mW VCSEL illuminator at an unbeatable $350 price point—the best watt-per-dollar value in night vision. All three lasers (IR illuminator, IR pointer, visible laser) are coaxially aligned, eliminating separate calibration and simplifying zeroing procedures. The adjustable power levels for both IR laser and illuminator help reduce halo effects and allow optimization for different engagement distances.
The Trinity's VCSEL (Vertical-Cavity Surface-Emitting Laser) technology provides clean, uniform illumination without the speckled patterns common in older LED or laser-based illuminators. SMS lists an adjustable divergence range of approximately 25-165 mRad, so users can dial from tight spot for distance identification to wide flood for close-quarters work. The official page lists a 0.7mW IR pointer, 520nm visible green laser under 5mW, and 100mW 850nm VCSEL illuminator.
Built with IPX8 waterproof rating and Crane plug compatibility for existing switch setups, the Trinity punches far above its weight class. While the illuminator slider can be stiff in cold weather and the device may require re-zeroing after significant impacts, these minor drawbacks are easily overlooked given the exceptional price-to-performance ratio. For budget-conscious NVG users who want maximum illuminator power without premium pricing, the SMS Trinity is a disruptive game-changer in the civilian IR market.
Key Features
- 100mW VCSEL IR illuminator—highest power for the money
- Coaxially aligned IR illuminator, IR pointer, and visible green laser
- Adjustable power levels for IR laser and illuminator reduce halo
- Variable divergence: approximately 25-165 mRad
- IPX8 waterproof rating for all-weather reliability
- Crane plug compatible with existing pressure switches
- Green visible laser (520nm, <5mW) for daylight zeroing
- Dual battery compatibility: CR123 or 16340 rechargeable
Pros
- +Incredible $350 price point—unmatched value in IR market
- +Highest IR illuminator power (100mW) in budget category
- +VCSEL technology provides clean beam quality
- +Coaxial alignment eliminates multi-device zeroing hassles
- +Adjustable power levels optimize for various distances
- +IPX8 waterproof and Crane plug compatible
- +Rechargeable 16340 battery option reduces operating costs
Cons
- −Illuminator slider can be stiff, especially in cold weather
- −May require re-zeroing after significant impacts
- −High-power laser mode can be excessively bright at close range
- −Adjustment complexity between diffuser, beam, and power levels
- −Less proven track record than established premium brands
- −Limited dealer support compared to Steiner/B.E. Meyers
Setup & Operation
Step-by-step procedures for setting up, operating, and maintaining the Trinity.
Mount the Trinity to a Picatinny Rail
The Trinity ships with a follow wrench sized for its rail clamp screw. Mount it at the 12 o'clock position on the upper receiver or handguard, far enough forward that your support-hand thumb reaches the pressure switch or fire button without breaking your firing grip.
Place the unit forward of any back-up iron sight base so the laser body does not crowd the sight picture. Trinity owners have flagged clearance conflicts with bulky rail sections, so dry-fit the position before you torque anything down.
- • Included follow wrench
- • Clean cloth
- 01
Confirm the rifle is unloaded
Drop the magazine, lock the bolt to the rear, and visually inspect the chamber before doing any work on the optic rail.
- 02
Choose and dry-fit the rail slot
Set the Trinity at 12 o'clock and check that the body clears your iron sight base and any forward accessories. Confirm your support-hand thumb can reach the activation button or remote pad from this slot before committing.
- 03
Seat the clamp on the rail
Drop the clamp over the chosen slot and press the unit forward against the rear face of the slot. Forward pressure indexes the cross-bolt against the rail, not the clamp screw.
- 04
Tighten with the follow wrench
Hold the unit forward and tighten the clamp screw with the included follow wrench until it is firmly seated. Use steady pressure and stop at firm resistance.
- 05
Verify there is zero movement
Tug the laser fore and aft. Any rock means the slot is loose or the cross-bolt is not seated; loosen, reseat, and retighten.
Do not overtighten the clamp screw. Excessive force strips the rail slot or rounds out the follow wrench. Firm hand pressure on the supplied wrench is enough.
Zero the Co-Aligned Lasers
The IR illuminator, IR pointer, and green visible laser are coaxially aligned from the factory, so you only zero the visible side. Once the green dot is on target, the IR pointer is on the same line. This is the Trinity's core workflow advantage: no separate IR calibration session under night vision.
Each click of the windage or elevation adjustment moves point of impact 0.8 MOA. Use the included zeroing wrench. The adjustment screws sit on the side (windage) and top (elevation) of the body.
- • Included zeroing wrench
- • Stable rest or sandbag
- • Target at 25 yards
- • Night vision device to verify IR alignment (optional)
- 01
Stage at 25 yards
Set a paper target at 25 yards. A 25-yard zero gives a usable point of aim out to roughly 200 yards on a 5.56 rifle and matches most carbine red-dot zeros so the laser and optic agree.
- 02
Activate the green visible laser
Switch the Trinity to its visible-laser mode. Green is bright enough to see on paper at 25 yards in daylight, which is why you zero on the visible side rather than fighting an IR dot under NODs.
- 03
Fire a 3-round group
From a stable rest, fire three rounds holding the green dot on your point of aim. Measure the group center against the dot's position.
- 04
Adjust elevation on the top screw
Seat the zeroing wrench in the top adjustment screw. Each click is 0.8 MOA, roughly 0.2 inch of movement at 25 yards, so plan on about 5 clicks per inch of correction.
- 05
Adjust windage on the side screw
Move to the side adjustment screw and correct left or right at the same 0.8 MOA per click. Count clicks so you can repeat or reverse the correction.
- 06
Confirm, then verify IR under night vision
Fire a confirming group with the visible laser. Once the green dot lands on point of aim, switch to an IR mode and verify under night vision that the IR pointer falls on the same hold. Factory co-alignment can shift after a hard impact; re-check it if the rifle takes a drop.
If the zeroing wrench stops turning, you have reached the mechanical limit of adjustment travel. Forcing past it damages the internal mechanism. Back off, re-check that the mount is square to the bore, and re-evaluate whether the rail itself is the problem.
Tune the IR Illuminator Beam and Power
The Trinity's VCSEL illuminator has a variable beam divergence of roughly 25 to 165 mRad, adjustable from a tight spot for distance identification to a wide flood for close-quarters work. Power is independently adjustable: run the IR laser at low power and the illuminator at high power to cut the halo that a bright pointer otherwise blooms across the night vision image.
For room-clearing and close NOD work, open the beam wide and keep power moderate. For 75-yard-plus target identification, tighten the beam to a spot and raise illuminator power. The illuminator slider can be stiff, especially in cold weather, which is normal and keeps it from wandering under recoil.
Run the IR pointer at low power whenever the illuminator is doing the work. A full-power pointer plus a full-power flood washes out detail under most night vision tubes; dropping pointer power restores contrast without losing your aiming reference.
Detailed Specifications
- Laser Class
- IR pointer 0.7mW; green visible laser <5mW
- Wavelength
- 850nm (IR), 520nm (green visible)
- illuminatorPower
- 100mW VCSEL
- Adjustment Range
- Approximately 25-165 mRad divergence
- Battery Type
- CR123 or 16340 rechargeable
- dimensions
- 3.54 x 2.36 x 1.18 inches
- weight
- 6.7 oz
- Material
- 7075 aluminum
- Mount Type
- Picatinny rail
- Waterproof Rating
- IPX8
- vibrationResistance
- 1200G
- Switch Type
- Crane plug compatible
Compatible Platforms
+220 morePairs Well With
Top matchesPalmetto State Armory
PSA PA-15 16" Carbine
1 shared compatibility tags
Smith & Wesson
Smith & Wesson M&P15 Sport III
1 shared compatibility tags
Ruger
Ruger AR-556 (Model 8502, State-Compliant)
1 shared compatibility tags
Diamondback Firearms
Diamondback DB15 16"
1 shared compatibility tags
Sig Sauer
Sig Sauer M400 Tread
1 shared compatibility tags
Sig Sauer
Sig Sauer M400 Forge
1 shared compatibility tags
Similar Products
Related Guides & Articles

Build Your Custom Configuration
Add the Trinity to your build and see how it enhances your platform.