Ballistics Calculator
Chart bullet drop, wind drift, velocity, and retained energy out to 1,000 yards using standard G1/G7 drag models. Pick a preset load, adjust for your barrel length and conditions, then copy the DOPE card to your phone.
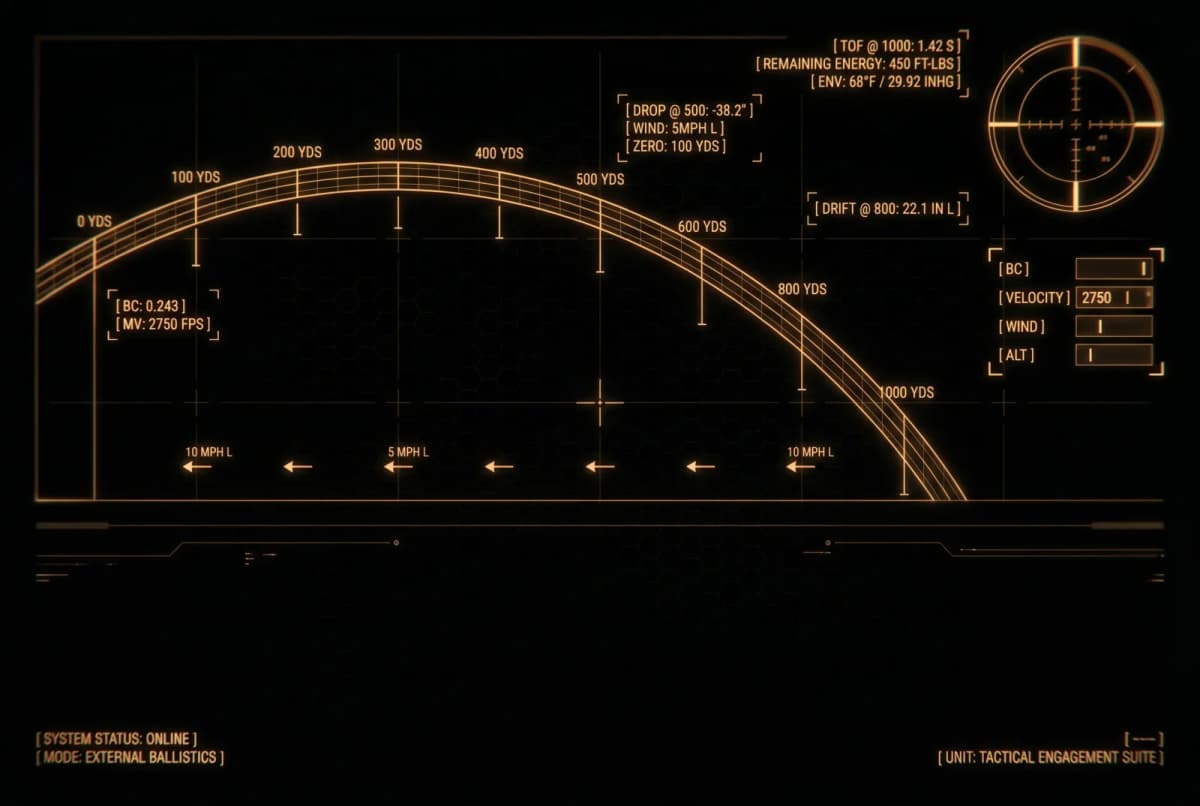
Ballistics Calculator
Calculate bullet drop, wind drift, and trajectory from 0-1000 yards. Select a preset ammunition profile or enter custom ballistic data.
Ammunition
BC: 0.243 (G1)
Velocity: 3240 fps
Weight: 55 gr
Standard military ball ammunition. High velocity, velocity-dependent fragmentation.
Zero Settings
Environment
Wind
Right Crosswind at 10 mph
Point Blank Range
225 yd
Hold center, stay inside 8" vitals
Supersonic Through
600+ yd
Accuracy degrades past the transonic zone
Velocity @ 600 yd
1282 fps
From 3240 fps at the muzzle
Energy @ 600 yd
201 ft-lbs
Retained kinetic energy at max range
Trajectory Table
| Range | Vel | Energy | TOF | Drop | MOA | Drift | MOA |
|---|---|---|---|---|---|---|---|
| 0 yd | 3240 | 1282 | 0.000s | -2.5" | 0.0 | 0.0" | 0.0 |
| 50 yd | 3030 | 1121 | 0.048s | -0.8" | 1.5 | +0.3" | +0.5 |
| 100 yd | 2829 | 977 | 0.099s | 0.0" | 0.0 | +1.2" | +1.1 |
| 150 yd | 2638 | 850 | 0.154s | -0.3" | 0.2 | +2.7" | +1.7 |
| 200 yd | 2454 | 736 | 0.213s | -1.9" | 0.9 | +4.9" | +2.3 |
| 250 yd | 2278 | 634 | 0.276s | -4.9" | 1.9 | +7.9" | +3.0 |
| 300 yd | 2109 | 543 | 0.345s | -9.6" | 3.0 | +11.8" | +3.8 |
| 350 yd | 1948 | 463 | 0.419s | -16.2" | 4.4 | +16.7" | +4.6 |
| 400 yd | 1794 | 393 | 0.499s | -25.2" | 6.0 | +22.7" | +5.4 |
| 450 yd | 1649 | 332 | 0.586s | -36.8" | 7.8 | +29.9" | +6.3 |
| 500 yd | 1515 | 280 | 0.681s | -51.7" | 9.9 | +38.4" | +7.3 |
| 550 yd | 1392 | 237 | 0.785s | -70.3" | 12.2 | +48.5" | +8.4 |
| 600 yd | 1282 | 201 | 0.897s | -93.4" | 14.9 | +60.1" | +9.6 |
Trajectory Chart
Line of sight = 0". Drop shown in inches.
Range in yards. Highlighted dot = zero distance (100 yd).
Getting Accurate Dope From the Calculator
The calculator is only as good as three inputs: muzzle velocity, ballistic coefficient, and zero distance. Muzzle velocity matters most. Factory box velocities are measured from test barrels that rarely match yours, so use the barrel length selector on preset loads, or better, chronograph your rifle and enter the real number in custom mode. Our barrel length guide covers how much velocity each inch of barrel is worth per cartridge.
Zero distance changes every downrange hold, and the right zero depends on the rifle's job. Run the same load at a 50-yard and a 100-yard zero here and compare the tables; then confirm on paper using the printable targets in our optic zeroing guide. For the cartridge theory behind the numbers, including 5.56 versus 300 BLK versus .308 drop comparisons, read the full ballistics guide.
Environmental corrections are second-order but real: thin air at altitude flattens trajectories noticeably, so a load zeroed at a sea-level range shoots flatter at a 6,000 foot elk camp. The wind inputs model a constant wind across the whole flight path, which is a simplification; real wind calls take practice, and the drift column tells you how much a misjudged wind costs at each distance.
Frequently Asked Questions
How much does a 5.56 bullet drop at 300 yards?
A 55gr 5.56 load leaving a 16 inch barrel at about 3,150 fps drops roughly 10.5 inches at 300 yards with a 100-yard zero, about 3.3 MOA of correction. Heavier 77gr match loads like Mk262 drop closer to 14 inches at the same distance because they start about 470 fps slower. Exact drop depends on muzzle velocity, ballistic coefficient, sight height, and zero distance, which is why running your specific load through a calculator beats memorizing a generic chart.
At what range does 5.56 go subsonic?
Around 675 yards for 55gr M193 at 3,150 fps, and around 850 yards for 77gr Mk262 from a 16 inch barrel at standard sea-level conditions. Bullets get unstable passing through the transonic zone (roughly 1,340 down to 1,120 fps), so treat those distances as the practical accuracy ceiling for each load rather than a hard wall.
What is a ballistic coefficient, and what is the difference between G1 and G7?
Ballistic coefficient (BC) measures how efficiently a bullet cuts through air; a higher BC means a flatter trajectory and less wind drift. G1 and G7 are two standard reference shapes: G1 models flat-base bullets and produces bigger numbers, while G7 models modern boat tail bullets and stays truer across a wide velocity range. The same bullet has very different values on each scale. A Berger 130gr 6.5mm is 0.560 G1 but 0.287 G7, so always enter the BC with the drag model the manufacturer published it under.
What is the best zero distance for an AR-15?
A 50-yard zero is the most practical all-around choice for a general purpose AR-15. With 55gr 5.56 it keeps impacts within about 2 inches of point of aim from the muzzle out to roughly 250 yards, so you can hold center on torso-sized targets without thinking. A 100-yard zero groups tighter for bench and precision work but gives up more drop at distance, and a 36-yard zero trades midrange predictability for a slightly flatter far-side hold.
What is maximum point blank range?
Maximum point blank range (MPBR) is the farthest distance at which you can aim dead center and still hit inside a given vital zone with zero holdover. For 55gr 5.56 with a 50-yard zero, MPBR on an 8 inch target is about 275 yards. Hunters use MPBR to set a zero that covers every realistic shot without dialing; the calculator reports it for 4, 6, 8, or 10 inch target zones.
Does barrel length change bullet drop?
Yes, through muzzle velocity. M193 leaves a 20 inch barrel at about 3,240 fps and drops roughly 9.6 inches at 300 yards with a 100-yard zero, but from a 10.5 inch barrel at 2,700 fps the same bullet drops about 16.6 inches, over 70 percent more. Retained energy falls off just as hard. The calculator's barrel length selector applies per-barrel velocity data for each preset load so you can see your actual barrel's trajectory instead of the box-flap number.
How much does wind push a 5.56 bullet?
A full-value 10 mph crosswind drifts a 55gr 5.56 bullet about 12 inches at 300 yards and about 40 inches at 500 yards. Heavier, higher-BC bullets buck wind better: 77gr Mk262 drifts about 9 inches at 300 yards in the same conditions. Wind is the hardest variable to read in the field, which is why long-range shooters pick high-BC loads even when the drop advantage looks small on paper.
How accurate are ballistics calculators?
Accurate enough to get first-round hits on torso-sized targets through the supersonic range of your load, provided the inputs are right. This calculator runs a point-mass model against the standard G1 and G7 drag tables, the same method most commercial solvers use. The dominant error source is input data, not the math: chronograph your real muzzle velocity instead of trusting the ammo box, use the BC and drag model your bullet maker publishes, and confirm your zero on paper. BC-based predictions drift from reality for bullets that don't match the reference shape and degrade sharply past the transonic zone, so verify long-range dope with real impacts.
Building a Rifle Around a Cartridge?
Use the Configurator to pick a platform and components matched to your intended range envelope, from CQB carbines to 1,000-yard precision builds.
Launch Configurator